Followers

Showing posts with label Project. Show all posts

Thursday, December 8, 2011

Birthday Tag Book Mo's DT Post # 112

It still Dorcas' turn to be our hostess and she thought it would be a good idea for us to use Banners or Tags on our card or project. Well since I love to dabble in all types of paper projects and I've been dying to use this Pocket Page & Tag Die for my Big Shot Pro, I decided to drag it out and make a Birthday Book. I did the calendars on the computer and did a tag for each month so on one side of the tag will be the dates for birthdays that are from the 1st throught the 15th and on the back of the tag will be the dates for birthdays for the 16 thorugh the 30th or 31st. Just write who's birthday it is on the line provided.

I used Bella Carrying The and the Cake which you can find HERE and HERE My Minds Eye Paper since you need double sided paper for this project flowers from Wild Orchid Crafts which you can find HERE and the ribbon and lace from The Ribbon Girl which you can find HERE

Here is a picture of the Birthday Book:


The book with one of the tags pulled out of the pocket:


The book open:


I hope I inspired someone to join in on the fun, I can't wait to see what you come up with, just don't for get to use one of Mo's images. If you need more inspiration don't forget to visit the rest of the teams blogs they really out did themselves and came up with some great ideas just click HERE to see what they came up with and as Pat always says, don't forget to leave them a little love.

I am entering this in the following challengegs:
Charisma Cardz Challenge: HERE No Cards
Cute Card Thursday: HERE Anything Goes
Inky Impressions: HERE Ribbon
Die Cutting Divas: HERE Tags, Tags and More Tags
Paper Take Weekly: HERE Anything Goes
The Crazy Challenge: HERE Anything Goes
Craft Your Passion: HERE Anything Goes with Glitter


As always, thanks for stopping by my part of the world, and now that you're here why not leave me a little love as well your comments mean so much and always brighten my day.

Image: Mo's Digital: Bella Carrying the Cake
Paper: SU: Purple, My Minds Eye
Extras: WOC Flowers, Ribbon from the Ribbon Girl, Rhinestones,
Image Colored with Copies,

As always, thanks for stopping by my part of the world, and now that you're here why not leave me a little love as well your comments mean so much.

Hugs
Debbie

Monday, October 31, 2011

Halloween Treat Boxes

Taylor my son's girlfriend and I decided we would craft and make these coffins for Halloween. Let me tell you what a conversation starter these were when people asked us what we did today?, and we answered, We made coffins. You had to see the look on their faces. Especially when one of them said, You do realize I am an ex-New York City Police Officer and currently a a Sheriff in New Jersey. Then we showed him what we made...lol Anyway, these are the two that we made for her nieces. We really had a great time making them and can't wait to craft and bond again. We are really looking forward to it.

This one we did with ghosts, this is the top of the box:


Here is a side angle of the box


This is the side of the Frankie Box:


The top of the Frankie Box:


and last but not least the two boxes together:


I am entering this into the following challenges:
Totally Paper Crafts: HERE Glitter it - Well I think glitter coffins count...lol
Stampin for the Weekend: HERE Spooky
Scrappy Frogs: HERE Something that Flies - well the bats fly
Our Creative Corner: HERE Fancy Folds- Hope this counts since it is a die cut, but it is folding
Saturday Challenge: HERE SPOOKY OR WHIMSICAL
Simon Says: HERE Anything Goes
PollyCraft Monday: HERE Anything Goes
Lollipop Crafts: HERE Anything Goes
Bah! HumBug! HERE To Use a Die Cut - Well the Coffin is a Die Cut after All

Image: Tags so Much
Paper: Reflections, Whisper White,
Extras: Wild Orchild Craft Flowers, Rhinestones, MS Border Punch, Bat Punch, Stickers,SU Tag Punch
Big Shot Pro Die Cut

As always, thanks for stopping by my part of the world, now that you're here, I would love hearing from you, your comments mean so much.

Hugs
Debbie

Thursday, October 27, 2011

I See Lots of Treats!!! DT Post #106 Holiday or Celebration

It's still Elaine's turn to host, and she wanted us to make something for a holiday or celebration. With so many holidays and celebrations coming up I choose Halloween especially with it right around the corner. I honestly miss trick-or-treating with the kids and yes one year my Aldo did dress up as a pirate so of course this reminded me of him as so many of Mo's images remind me of my boys.

So this week instead making a card, I did something a little different and made this Halloween Luminaria after I saw a gorgeous one on Mindy's blog which you can find Here she really does beautiful work and has inspired me for quite some time now. Anyway,you can find the directions on Splitcoast Stampers HERE


I merged again and used Pumpkins which you can find HERE and Captain Hugo which you can find HERE


The Back of the Box:


I used flowers from Wild Orchid Crafts which you can find HERE and the ribbon is from The Ribbon Girl which you can find HERE

Image: Mo's Digital Pencil: Pumpkins & Captain Hugo
Paper: Vellum DP from Stash & SU Burmuda Bay
Extras: Oval Nestibilitie, MS Fench Punch & Boo Punch, Flowers from Wild Orchid Craft
Ribbon from The Flower Girl

I hope I inspired someone to join in on the fun, I can't wait to see what you come up with, just don't for get to use one of Mo's images. If you need more inspiration don't forget to visit the rest of the teams blogs they really out did themselves and came up with some great ideas just click HERE to see what they came up with and as Pat always says, don't forget to leave them a little love.

I will be entering this in the following challenges:
Paper Sundaes: HEREBlack,Sparkle, FLowers, Distressing I have Black and Flowers
Fab n'Funky Challange: HERE Hubble, bubble toil and trouble
Simon Says: HERE Anything Goes
Paper Pretties: HERE Embellish ... use brads, eyelets, flowers, bling etc on your card to embellish it! _ I used flowers and ribbon
Paper Play Challange: HERE Halloween or Witch
Paper Crafting Journey: HERE" Use a Digi

As always, thanks for stopping by my part of the world, and now that you're here why not leave me a little love as well your comments mean so much.

Hugs
Debbie

Thursday, August 25, 2011

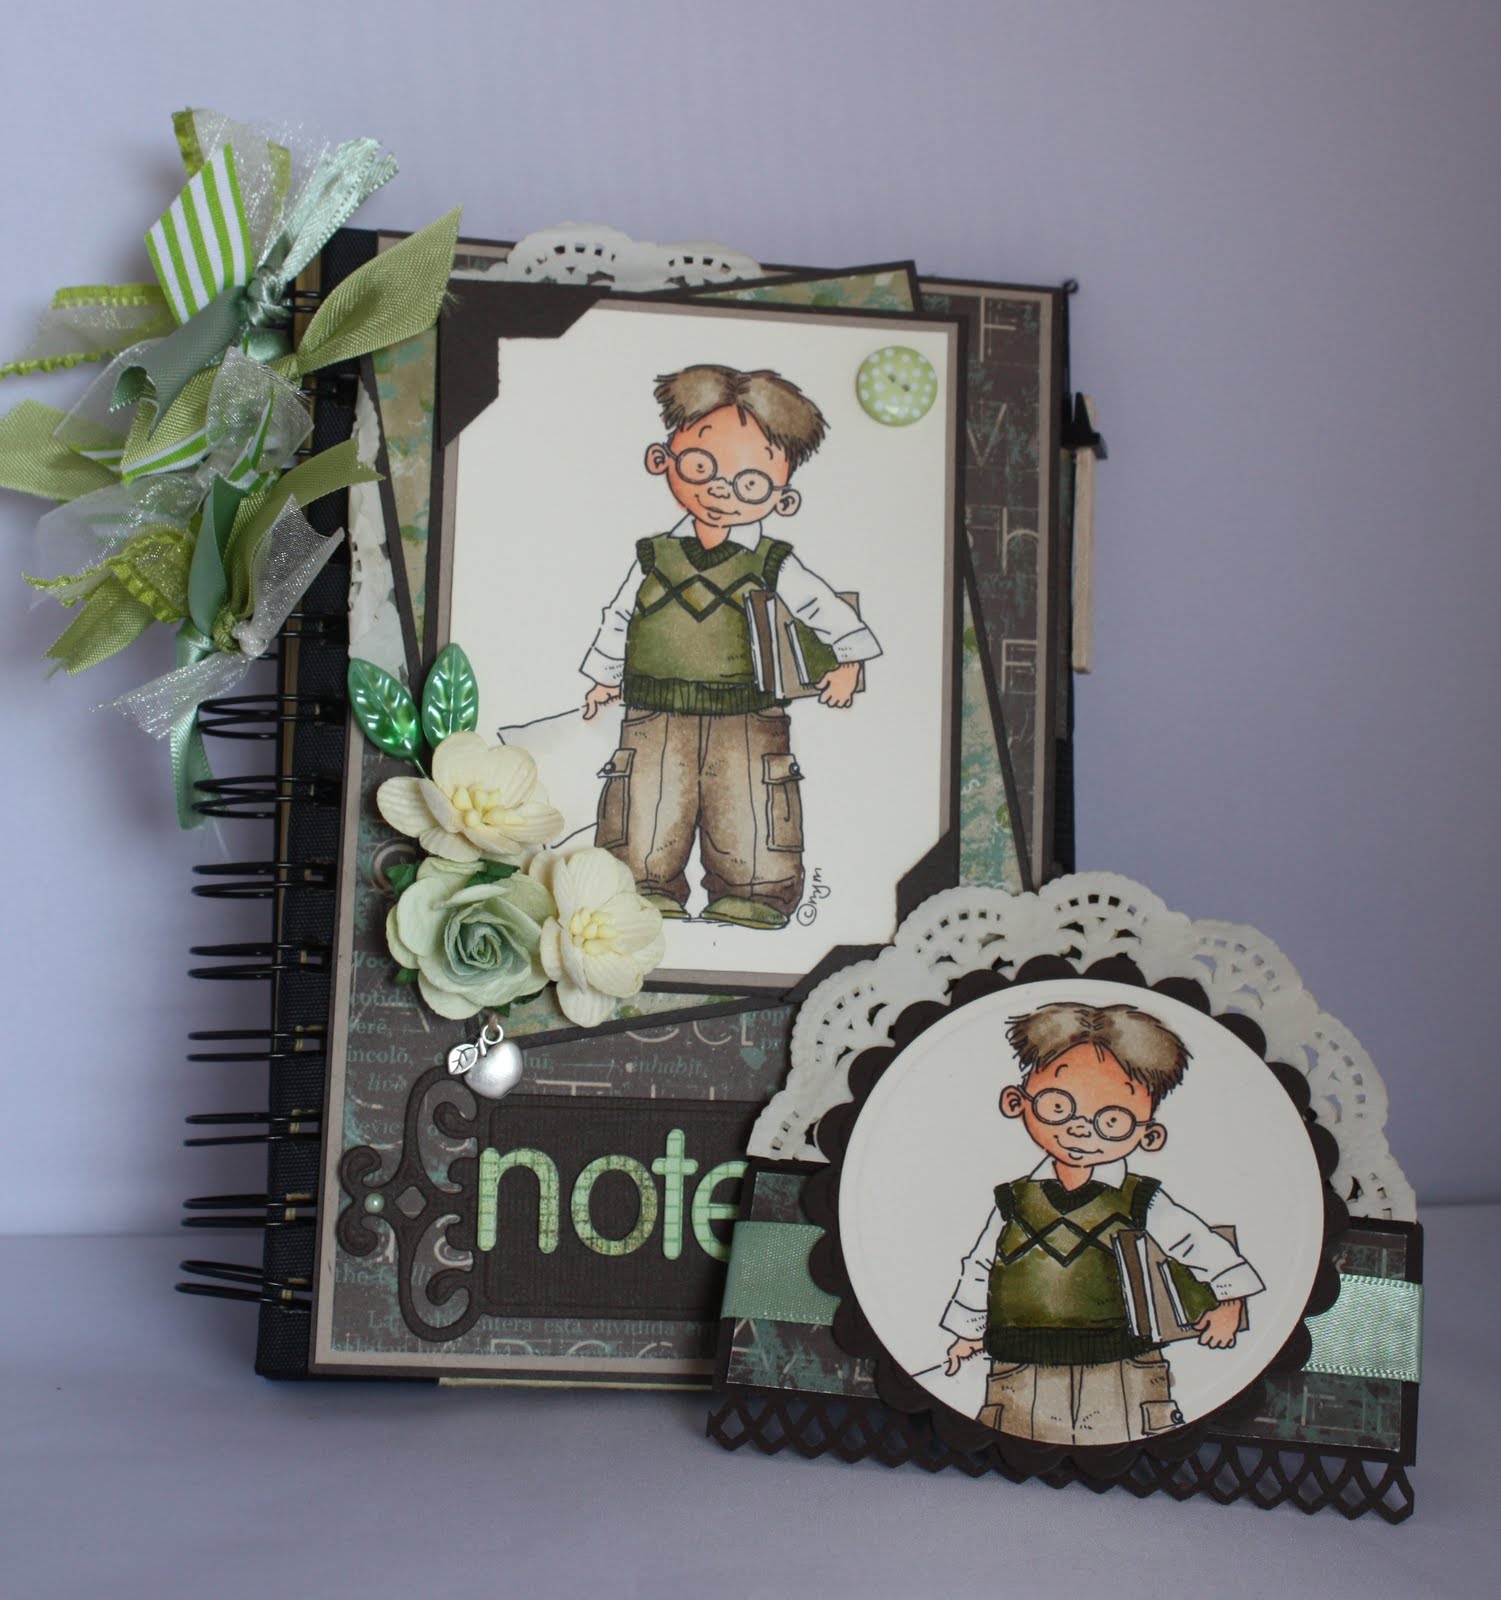
#97 at Mo's Back to School Gift Set

Well, it's my turn to host again this week so I decided that since I will be back to work after Labor Day that I would choose my theme as "Back to School". I guess summer vacation is over. I must say I had a great summer. but all good things must come to an end.

I thought "Harvard" was perfect for this theme. He is such a cutie, and of course in 4 more years I am hoping my son will be "Harvard" bound for law school. But lets let him finish his first 4 years of college first. Anyway, you can find "Harvard" HERE


I made this gift set as my back to school project. I altered this notebook and made a matching corner book mark which you can find at Splitcoast Stampers
HERE and of course since I am still dabbling with Fimo, this little set to go along with it.


A close up of the corner book mark:

I used flowers from Wild Orchid Crafts which you can find HERE and the ribbon, pin, button and charm are from The Ribbon Girl which. They really have so many beautiful charms and of course their gorgeous ribbons. You can find them all HERE I just tied three different ribbons on to the spiral part of the note book alternating the ribbons as I went down the spine. Giving it this full affect.


So I hope I inspired some of you and you play along with this weeks theme "Back to School" and don't forget to visit my Design Teams blogs for even more inspiration. They really are a talented bunch and would love hearing from you.

Image: Mo's Digital pencil - Harvard
Paper: TPC Studio - School Days Alphabet Jumble,
Extras: Nestibilities, SU Photo Chorner Punch, Buttons, Charm, Wild Orchid Craft flowers, Ribbon, Pins. Basci Grey alphabet stickers for Notes
Image Colored with Copics

As always, thanks for visiting my part of the world, now that you're here I would love hearing from you.

Hugs
Debbie

Sunday, June 5, 2011

Candy Bar Card

I found this tutorial on the Scor-Pal site which you can find here
so I thought I would give it a try. I changed it up a bit, by adding the slip off band along with the image in the circle, I wanted to give it that extra pizazze. It really was so fun to make and I can see myself using it for many different occassions since they would be great party favors, or that extra something for a family member, teacher or friend.


Here is a picture of it open:
Open with the band:

Another Angle


A Close up of the image:

I am going to enter this into the Following challenge:

Just Magnolia/hAnglar sTanglar where the monthly challenge is Anything Goes with the option of adding Lace
PaperTake Weekly Challenge Anything goes

Image: hAnglar/sTanglar-Messenger
Extras: Pearls, Nesties, Cuttlebug Corner Die, Extra Large Chocolate Bar
Paper: Basic Grey, Basic Black, So saffron
Image Colored with Copics and Prisma Pencils:

As always, thanks for taking the time to stop by my part of the world, hope you like what you see, would love hearing from you.

Hugs
Debbie

Saturday, April 23, 2011

Another Cadbury Box with Matching Card


Well, now that I gave everyone the measurements for the last one, I was able to make this one in no time flat. What took me a few hours on Tuesday since it was trial and error and more errors than trials...lol now ony took a matter of one, two, three to cut and score the basic shape for the box. I also learned to place the DP directly on the card stock, then score!!!! Much easier that way..

The Box


The inside of the card:

This one is for my son's girlfriend so one down and two more to go..I think my boys would be disappointed if I didn't make them something from the Easter Bunny..lol


I am entering this into the following challenge(s)
The ABC Challenge S is for Sparkle - My card has sparkle on it
Scrappy Frogs Challenge Easter

Image: hAnglar Easter Collection Sentiment: A Muse
Papers: All papers from SU- CS Pretty in Pink & Kraft
Extras: Swirl Rhinestones, Wild Orchid Craft Flowers, Ribbon, Button, Cuttlebug Corner Die
Image Colored with Copics

Hope you like it, as always, thanks for stopping by my little neck of the woods. Would love for you to leave a comment now that you stopped by.

Hugs
Debbie

Wednesday, February 23, 2011

Magnolia File Folder

This is my first attempt at a pre-scheduled post, if I did this right, it will post today Wednesday, February 23, 2011 and I will be Broadway Bound with my two sons and my oldest sons girlfriend to see "Rain" which is a tribute to the Beatles. We are huge Beatle fans so this is a treat. It was such a hit that it was extended for a few more weeks and I was lucky to get tickets. It will also be the first of two trips into the city this week to see a Broadway show. My next trip will be on Saturday to see "Billy Elliot". I'll be seeing this with a few of my colleagues from work. We try to see a Broadway show each and every time we have a break from school. Next break we'll be seeing "Sister Act". I am so glad that I am a New Yorker and Manhattan is only a train ride away.

Anyway, after all that is said and done. Here is my Accordian File Folder


A friend asked for a few Magnolia images, so I thought what better way to present them to her but in the accordian file folder. Like me, her favorite color is blue so I did it in blues tones to personalize it for her. This is the third one I've made, and you'd think I'd learn my lesson when it comes to using my word window punch, which is used to punch the hole for the strap that holds it together. I did it after the file folder was done and thought it was straight, but alas, the hole is crooked but I guess that's what makes it hand made.


Here it is open, it can hold about 4 images per pocket:


The directions can be found
here

It was fun to make, and I'm sure I will make a few more, only this time I'll punch the hole before I put it together..

Image: Tilda-Mermaid
Paper: DCWV-Linen Closet, Papertrey: Blueberry
Extras:" Ribbon, Doohicky Swirl Die, Sizzix Leaf die, Wild Orchid Crafts Flowers, Nestibilities, Word Window Punch, Envelopes, MS Border Punch
Image colored with Copics: Face/Skin: E13,11,02,00,000,R21,20 Hair: E30,31,33,35,Tail/Bra:Blues: B21,23,45,000 R20

As always, thanks for taking the time to visit my blog, would love hearing from you, your comments mean so much

Thanks
Debbie

Tuesday, January 18, 2011

Pencil Holder with Tutorial

I found this tutorial awhile back and have always wanted to give it a try. When I looked at the date of the print out it was from May of 2009. Took me long enough right. I tried to do a direct link but for some reason when i tried to do it, it said the link appears to be broken, so just copy and paste this

http://creationsbypatti.blogspot.com/

then on the right click on tutorials and it is around the third page

Pencil Holder Closed:
The Case Open:
the top:

The Band:

It was alot of fun to make, it did take awhile, but I guess because it was my first one, now that i kinda have an idea of what to do, the next one should go much easier
Paper: Stampin Up
Extras: Cuttlebug Swiss Dot embossing folder, MS border punch, Prisma flowers, Rose, self adhesive pearls, sizzix swirl die cut, MS butterfly punch, Sizzlet heart embossing die, SU heart punch, Red Ribbon,

As always Thanks for looking
Debbie